Signed in as:
filler@godaddy.com
Signed in as:
filler@godaddy.com
The YSI EXO instrument is a multi-parameter data sonde that is an industry standard in aquatic monitoring programs. The Panther Logger can power and read this instrument in long term deployments, such as on a data buoy or a fixed monitoring station over a river. In this tutorial we show how to wire up the EXO2 sonde with the Panther Logger and program the Panther Logger to request, receive and parse serial data from the EXO2 using the Panther Logger's RS232 serial interface.
In order to read the EXO2 sonde with the Panther Logger you will need the following:
The EXO2 sonde does not output RS232 signals by itself. To do this, YSI sells their customers a device called a DCP Adapter which translates YSI's proprietary signal into RS232 and SDI12. Use of this adapter is discussed in the EXO2 manual (link here). Note that the EXO3 sonde has integrated SDI12 output. As such it would make more sense to read an EXO3 sonde with the Panther Logger using SDI12 since the DCP adapter would not be needed.
Before doing any wiring make sure the battery on the Panther Logger is unplugged and that no USB cable or solar charging source is plugged into the Panther Logger. In this tutorial we are wiring the EXO sonde and DCP adapter on the bench top indoors just for testing purposes. However, keep in mind that for outdoor deployment the Panther Logger board, battery and in this case also the DCP adapter must be in some type of environmental enclosure that prevents water and dirt intrusion. Therefore, wires from the EXO sonde cable must go through the enclosure using a connector or cable gland and this cable should have tension release.
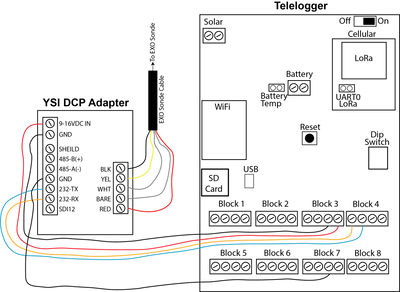
The EXO sonde cable should terminate in flying lead wires with the insulation stripped back about 5 mm. These are plugged into the five screw terminal block of the DCP adapter according to wire colors marked, as explained in the EXO sonde user manual (page 35). On the other side of the DCP adapter run a red hookup wire from the screw terminal marked "9-16 VDC IN" to one of the 12VS screw terminals of the Panther Logger. Run two black wires from the two screw terminals on the DCP adapter marked "GND" to ground (GND) pins of the Panther Logger. Run another wire color from the terminal marked "RS232 - RX" on the DCP adapter to the TX2 pin on the Panther Logger and another wire color from the terminal marked "RS232-TX" on the DCP adapter to the RX2 pin on the Panther Logger. See the image to the right as a guide.

The EXO sonde requires that we send it RS232 commands (page 38 of the EXO manual). These commands can be used to activate the sonde's wiper, wait for the dissolved oxygen sensor to warm up, change baud rates and request data among a few other tasks. Commands must end with a carriage return (i.e. "/r").
Go to our Github page for the "ReadEXO_RS232" script here. Copy and paste into a new script in the Arduino IDE and save it. This script powers on the EXO with the switched 12VS rail of the Panther Logger, then waits for it to startup and complete one wipe of the sensors, then requests data with the command "data/r" , reads it back and then parses that data into individual float values. The script then turns off the 12VS switched rail and the EXO sonde powers down. After a delay of 10 seconds the loop repeats.
The data/r command returns a comma separated string of values. This string of values is defined in the sonde. To identify this string of values it is necessary to connect the sonde to a PC using the YSI USB adapter for EXO sondes and the KOR EXO software. In the deployment section of the software the order of sensor output variables can be chosen.
With the DCP adaptor and EXO sonde hooked up to the Panther Logger, attach the USB cable to the Panther Logger board to power it and to your computer. Plug in the battery if available. Upload the ReadEXO_RS232 script to the Panther Logger board and open the serial monitor. You will see the serial monitor report when it is turning on th EXO and waiting for it to complete a wipe of its sensors. At the same time you should see the blue and red LEDs on the sonde turn on. The LED on the DCP adaptor will turn on solid for several seconds and then turn off. After about 20 seconds the DCP adaptor LED will start to blink and then data will be requested by the Panther Logger, which will show up in the serial monitor.
We use cookies to analyze website traffic and optimize your website experience. By accepting our use of cookies, your data will be aggregated with all other user data.